blog entry
A Git Novice's Guide to Git
Permalink for A Git Novice's Guide to GitGit is a big, intimidating piece of technology that provides a huge amount of the infrastructure for how projects of all kinds are created, maintained, updated, and worked on collaboratively. It's easy to understand why someone might be put off from learning Git. If you are working on a project solo, there's a fair chance that you don't bother using something like Git. However, I implore you to integrate Git or a similar versioning system into your projects. It's extremely useful to be able to revert changes if they break something, and being comfortable with the concepts in Git will help you work collaboratively with others in the future. In this post, we'll just barely scratch the surface, but I'm hopeful that what I describe here will be helpful to you as a starting point. We'll go through what Git is, why you might want to use it, how to set up your first repository, and how to link that up with a Git service for additional features.
What Even is Git Anyway? Permalink to this heading
Before I tackle what Git is, specifically, let me tell you what it is not. GitHub, GitLab, Forgejo and Codeberg are all services that interface with Git, but they don't own it and you technically don't even need to use one to benefit from what Git offers you. Let's see what the people who made Git in the first place call it.
Git is a free and open source distributed version control system designed to handle everything from small to very large projects with speed and efficiency.
Okay, so that's a lot of jargon. Let's break it down. First, Git is free and open source. If you've been reading the rest of my blog, you should have a decent idea of what this means. It means not only is the compiled, ready to run version of Git free, but the uncompiled source code is too and anyone can help the project by contributing to it and everyone using the project will benefit! Next, Git is distributed. That just means that it's built with an intention of allowing people to access and manage a Git repository from different locations. Finally, we get to the meat of it. Version control is the true power here. A version control system is a protocol or program designed to help make sure that the versions of files are in sync between different people working on the same project, but also allow project maintainers to roll back to an earlier version easily. If you've had a folder full of files with names like "project v1, project v2, project final, project final final" before, you've done some manual version control. Git is semi-automated and organized to make that process easier.
Why Would I Want Version Control? Permalink to this heading
Version control is basically an undo button for an entire project that can target any specific release or change to that project all the way back to the very first initial commit. It's extremely powerful. Let's take a couple hypothetical scenarios to see what I mean.
Let's say you're working on a website. You rewrite your whole main page. You put in new art, new CSS, new HTML, even new content. You spend a long time working on this page, but when you upload it, it breaks. Something happened along the way that just destroyed your entire page. Nothing is working right and now, after a long day working on it, it's midnight. You need sleep. You can't re-do the whole thing, but you also don't want the page to be broken or completely blank until you can fix it. With version control, you can revert back to your last change, when everything was still working, and set that as the new current "main" version of the site, effectively undoing all of your changes. But your changes still exist! You can re-check out your changes and work on them until they work, then overwrite the "main" branch with your updates. Sure, you could just be really diligent with backups, but everyone knows that one tiny fix can snowball into a much bigger rewrite and you may not back up for a small fix. Version control gives you automatic backups forever because you can go back to any point in time you want to very easily.
Here's another situation. Let's say you want to make a project with a friend. They're really good at some things and you're really good at other things. It would be really nice if you could work on your own versions of the project and combine changes down the line, right? Well, with version control, you can do exactly that. You make a change and commit that change to the repo. Your friend makes a different change, pulls your changes from the repo, then merges their changes with yours and pushes that back up tot he repo. Now, both of you are making changes without interfering with each others' versions of the files.
Git Terminology Permalink to this heading
I've used a few terms in this post already, but it's probably worthwhile to give us some working definitions so that we're all on the same page.
-
Repository - A digital container for all of the files related to a project. You can think of this as a folder full of all the files used for a project.
-
Commit - Both a bundle of changes made to the repository and the state of the entire repository when that change was submitted.
-
Branch - A version of the project with a unique label. One branch will be the main branch for the project. Others will have diverged from that main branch at some point and may be merged back in later.
-
Merge - The act of combining the code from a commit or branch into another branch, usually the main branch.
-
Pull Request - A message and process for a contributor to request that changes they've made to the project be merged into the main branch.
-
Maintainer - The person or people currently acting as primary developers on a project. They are the ones who approve or deny pull requests from contributors.
-
Contributor - A person who has made changes to a repository.
-
Diff - A summary of changes between the current version of a file in the repository and a newly committed one.
There will be a few more of these terms, but I'll explain them as we go.
The Repository Permalink to this heading
There's a couple of ways to think of a Git repository. On your computer, at any given time, the repository is just a folder full of files. Your repo is everything inside a project folder. From the Git perspective, though, your repository has so much more information. There is a hidden .git folder inside your repository that stores information about the repository, the remote repository you're attached to, and the files in your local copy. You don't need to and shouldn't interact with the .git folder directly at all. Git itself will handle everything for us once the configuration is set up.
Let's take a look at the repo for this blog.
tk-web-quest/
├─ .forgejo/
├─ .git/
├─ archetypes/
├─ assets/
│  ├─ css/
│  ├─ images/
├─ content/
│  ├─ games/
│  |  ├─ ...
│  ├─ posts/
│  |  ├─ ...
│  ├─ search.md
├─ i18n/
├─ layouts/
│  ├─ partials/
|  ├──├─ ...
│  ├─ _default/
├─ static/
│  ├─ icons/
│  ├─ images/
├─ themes/
│  ├─ PaperMod/
├─ .gitmodules
├─ .hugo_build.lock
├─ hugo.yaml
├─ readme.md
As you can see, there's a few dotfiles and folders. Anything that starts with a dot is hidden by default and managed by either git or hugo, so we can safely ignore them. Everything else is how my blog project folder looks right now. Now let's look at the other side of the repo, all the changes and commits that have been made. This is the working tree. My working tree is really long and linear, but there is one interesting section, so let's look at that.
*   fd4a494 Merge pull request 'fixing images' (#4) from testing into main
|\
| * 55c6bf8 fixing images
* | db6d18d another 's
* | 42e53b5 accidentally an 's
* | c8c8119 Merge pull request 'remove mana' (#3) from testing into main
|\|
| * 185cf59 remove mana
* | 93aae11 Merge pull request 'Merge PaperMod theme change, new post.' (#2) from testing into main
|\|
| * 6e957ed commit to this theme change, add post
| * 494bad6 switching themes
| * 07000ed revert regression with render hooks
| * ab6c6c8 testing image render hook
| * 5fb2f69 fix
| * 0d4e635 testing RenderHook
* | 8ad6114 merge
|\|
| * b141933 switch hugo.toml to yaml format
|/
* 8aa9f76 images?
Here you can see the commit ID and commit message for each commit. The lowest commit here is the oldest and the top one is the newest. You can see I had some trouble with images. Then, I made a branch where you see the |/. The left branch is the main branch and the right branch was made to test switching the site's main config file from TOML to YAML format. You can see that in the first commit above the branch. The next line, |\| is showing that I merged the changes from the branch, but I didn't terminate it. That merge comment is the next line up. The asterisk is on the main branch because that's where the commit was pushed to. A little further up, you can see another merge without termination, then a commit on each branch, then a few more commits to main, one last commit to the new branch, then another merge. This time the merge terminates the branch and we get a longer message. "Merging pull request..." I made a pull request on my own repo, then approved it and terminated the branch. This setup let me test a bunch of features and such without pushing my changes to the real site and finally pull everything into the main repository when the testing was successful.
The key thing about this history is that if I ever wanted to go back and see the site from any specific point in time, I could simply checkout the commit from that time period and see it exactly as it was. using git checkout COMMIT-ID. It's like a built in time machine that goes all the way back to the very first commit I have for the project where the code is currently hosted.
Putting it all together Permalink to this heading
Okay, so now I hope you understand a little bit about why Git is useful and cool. Let's convert an existing website folder into a repository so we can start tracking it. We're going to start by creating a new repository on our code forge. I'm using Forgejo here, but the setup is very similar on GitHub and GitLab. Just click the + button next to your profile image on the site and select "New Repository." Since we already have a folder full of files, I'm going to leave the "initialize" box unchecked. Like the text there says, that means Forgejo won't create any extra files like a .gitignore or readme.md
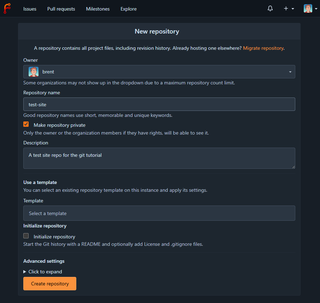
On the next page, you'll see a couple text boxes with instructions. We're going to follow the one for creating a new repository on the command line. Open a terminal in the root of your website project and run git init. This will create the .git directory we saw earlier and set it up with tracking. Next, run git switch -c main. This tells git to switch the active branch in the repository to be "main" which is generally accepted as the default branch for nearly any code forge. This command may or may not be necessary depending on your version of git. Next, we're going to add our files, but we aren't going to use the command Forgejo has laid out for us. Instead, we'll be using git add -A. This command tells git to add -All files to tracking on the current branch. Next, we're going to set up the commit with git commit -m "first commit". The -m flag tells git that the next string in the command is the commit message. The quotation marks are important because it tells the command everything between these marks is one string. Next, we're going to add the remote. Run git remote add origin https://YOUR-DOMAIN.com/USER/REPO.git. Your command will be different here because you will need to put in your forge's URL and your username and repo name. Finally, you're going to want to git push -u origin main. This command tells git to push your changes to the server and -update the remote associated with the repo to origin and the branch to main. In future pushes, you won't need the "-u origin main" part of the command.
Note: At this point, Git should give you some feedback on the authentication. If using Forgejo and Windows, it will open a browser and have your log into Forgejo and authorize Git to make the push. If the command fails, you probably need to change how you're pushing or make some changes so that your credentials can be included with the push. This specific issue is a big one and depends heavily on your OS, how you want to store or not store credentials, and what you're using for your remote git server, so I won't include troubleshooting steps here.
Now got back to your code forge and refresh the page. You should see something like this:
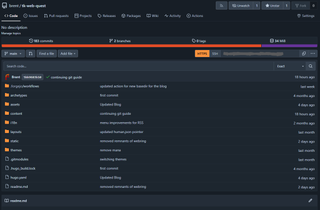
All your code is now on the forge! If you wanted to work on your site on another device, you could now use git clone REPO-URL.git to clone your repo, including the tracking. To push an update to your code forge, you just need three commands:
git add -A
git commit -m "commit message"
git push
You should be off to the races now. There's a lot more that Git can do, but for maintaining your site on your own with no need for branches, this is all you really need.
A Piece of the Actions Permalink to this heading
Note: This is only relevant if your specific instance or code forge has an Actions ecosystem and runners you have access to. Github and Gitlab have Actions and freely available runners for small workloads, for example, but private instances may not. For example, 32bit.cafe's Forgejo instance doesn't have Actions or Runners available.
One last part of Git that has become more important in recent years has been Continuous Integration and Continuous Deployment. Since a git commit is a specific action that can be used as a hook for other things, you can build off of it to automate some of how your repo works. For example, if your site uses a static site generator like Hugo, all the markdown you uploaded is well and good and maybe you even included the /public directory too, but what if you could have your code forge run your hugo --minify command for you? And what if it could then copy your site to your webserver? That's a Continuous Deployment workflow. Here's mine, for example. This file lives at /.forgejo/publish-main.yaml. My Forgejo instance has a Forgejo Runner attached to it. When a commit gets pushed to the main branch, Forgejo sends it to the runner. The runner then runs the action outlined in my action file.
name: deploy
on:
  push:
    branches: # This tells Forgejo when to run the action. Here, we're running it on push on the main branch
      - main
  workflow_dispatch: # This line lets me manually run the action if I need to.

jobs:
  deploy:
    runs-on: hugo # This is a label for the runner. Only a runner with the "hugo" label will run this job. The runner knows that it should pull the latest Hugo container to run the job in.
    steps:
      - name: Pull repo # This name is displayed in the web ui
        uses: actions/checkout@v4 # This is a reference to a built-in Forgejo action that copies the current state of the repo to a folder on the Runner so the runner can do its job using the files provided.
        with:
          submodules: true # Hugo themes are a submodule, so we need to make sure we include them
          fetch-depth: 0 # Fetch-depth tells the checkout action how deep into the repo to look for submodules. Depth 0 is unlimited.
      - name: build site
        run: hugo --minify # Here, we give the exact hugo command we want to run. In this case, we set the "--minify" flag so that the code gets minified before output. It makes the site smaller and lighter.
      - name: Deploy site with Rsync
        uses: https://github.com/Burnett01/rsync-deployments@v8 # This is an action maintained by a github user to deploy files from an Action to a remote server using Rsync.
        with:
          switches: -vzr --delete # Here's the flags for Rsync. These tell Rsync to be verbose in the log, compress files during transit, recurse through directories, and if a file doesn't exist at the source, delete it from the destination.
          path: "public/" # Hugo's output directory
          remote_path: "/mnt/homeserver/applications/apache/blog/" # The directory to put the files on the remote server
          remote_host: $ # These three lines are variables and secrets used by the action. I set them in the web UI for Forgejo and the action knows to replace the shortcodes here with the correct values.
          remote_user: $
          remote_key: $
Once the action runs, you can see the results of the action on your code forge. You can see one of the more recent runs of my deploy action here.
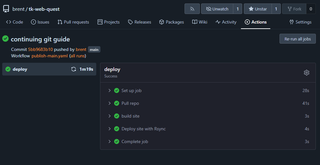
In-depth ins and outs of setting up and using actions is outside the scope of this guide. There's a lot of good information out there, though and the docs are generally pretty good.
The End of It Permalink to this heading
I never really know how to end these kinds of guide posts. Anyway, if you have questions or want to know more about any aspect of this, please send me a message through the contact page and I'll update the guide and answer you directly!